shopVOX Pricing Templates
 Updated
by Aaron Aldrich
Updated
by Aaron Aldrich
Pricing Templates in shopVOX
“Pricing Template” is where you can add extra components of pricing formula to either Basic, Formula or Grid which come together to create a custom formula to determine the price of an item you are trying to quote. You can think of a "Pricing Template" to be like your "Excel Spreadsheet" where you might have been doing all these formulas to come up with a price.
NOTE: You have to use either Basic/Formula/Grid as the primary pricing mechanism and then attach a template. If you want only template pricing to be reflected in the final price, use Basic and then make the Basic price = 0, so what ever the template calculates will be the final price of the product.
The following components are put together to make the Pricing Template.
- Pricing Templates
- Materials
- Machine Rates
- Labor Rates
- Pricing Attributes
- Pricing Formulas
And here is a visual representation of the above pieces.


Let’s understand each of the above pieces of the puzzle in detail:
Materials
Materials are, raw materials you will use to make your custom items. These could be your substrates, paper stock, accessories (like grommets, hemming tape etc.). Any material used in making the item.
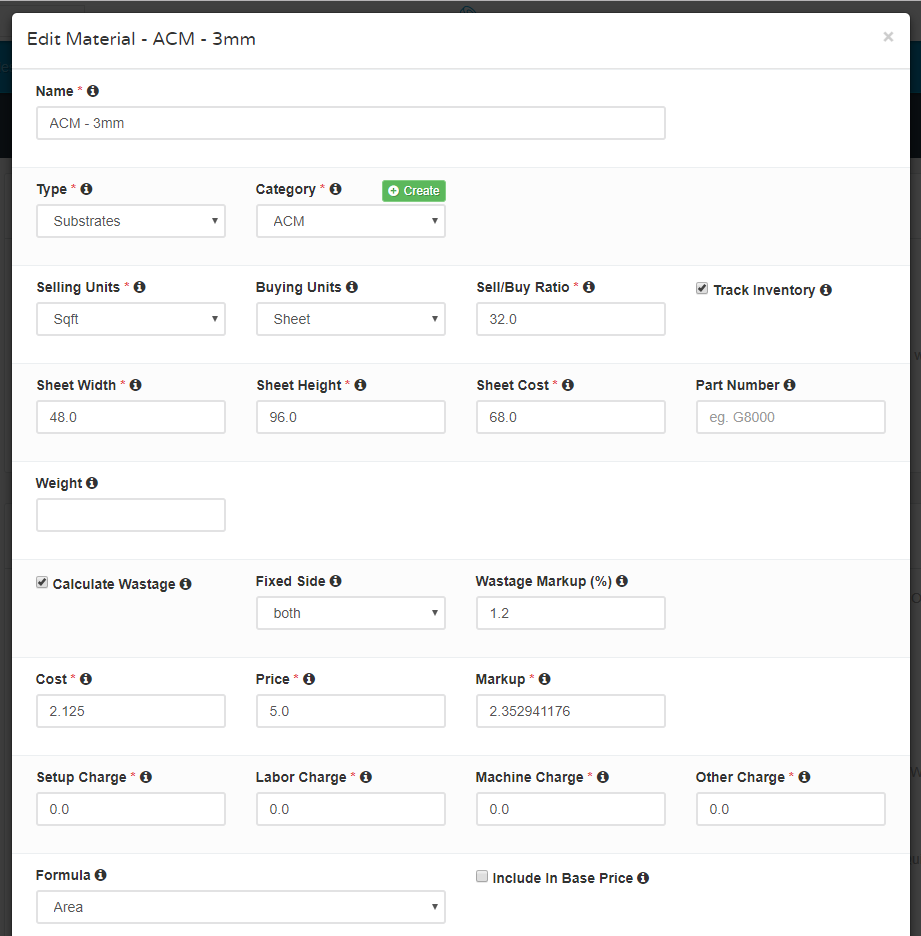
Key attributes of Material Definition:
Selling Units
Buying Units
Sell/Buy ratio
Formula - How much to use for a given item (depends on the Pricing Attributes - Example Formula can be “Area” and it will use the Height* Width)
Setup, Labor, Other Charges.

These are misc charges you can tack on whenever this material is used to make an item. These charges could be things like
- Setup Charge - Whenever I use this material it needs some setup hence I am going to charge $10 as a setup charge.
- Labor Charge - Whenever I use this material, I need to use a labor to set it up to load or unload material hence I want to charge $5.
- Machine Charge - Whenever I use this material, it needs a machine (tool) time, so you can tack on an extra fixed amount to it.
- Other Charge - Any other charges you want to add whenever this material is used.
- Note: These (Setup/Labor/Other) charges won't be multiplied by the Qty even if you have the "Per Unit" flag enabled.
These four charges, Setup/Labor/Machine/Other charges are optional ones and hence need not be used in every situation, but if need be can be tacked on.
***Notes:We have developed a set of pre-defined list of commonly used materials for the a few industries when you subscribe for shopVOX.
Machine Rates
These rates tell the system how much to charge for the Machine charges.
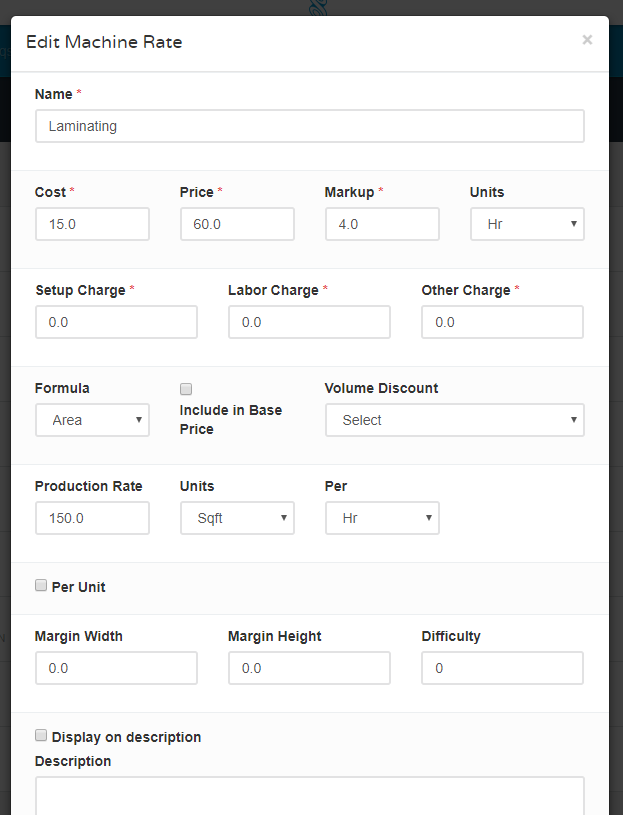
Key attributes of Machine Rates setup:
Cost - Price - Markup - Unit charge - How much to charge on a certain rate. This can calculate by amortizing your machine investment for a given period and come up with a rate that you would like to charge the customers for using the machine to service/produce an item.
You can charge by Hr, Minute or Per unit.
Setup, Labor, Other Charges.

These are misc charges you can tack on when ever this machine is used to make an item. These charges could be things like
- When I ever I use this machine it needs some setup hence I am going to charge $10 as an extra charge.
- When I ever I use this machine, I need to use a labor to set it up to load or unload material hence I want to charge $5.
- Note: These charges wont be multiplied by the Qty even if you have the "Per Unit" flag enabled.
These three charges, Setup/Labor/Other charges are optional ones and hence need not be used in every situation, but if need be can be tacked on.
Formula - How to calculate what amount to charge for a given item that you are estimating.
Choices are Area, Cyl, Volume, FIxed, Height, length, pBase, Perimeter, Unit, Volume, Width
Production Rate - Defines how much the machine can produce in a given period of time. When you have the charge of a machine on a per Hr/Min/Unit then there needs to be an output rate of this machine per Hr so that can be translated into how much to charge for a given item if this machine is used.
Per Unit Flag:

This flag basically multiplies the Line Item Qty while estimating. Generally this should be checked for any machine rate since the machine works more if the Line Item Qty is more and less of this is less.
Example: If you are making 50 widgets, and each widget takes 10 seconds, then you want to charge the machine charge 50x10 seconds = 500 seconds of machine time.
However there might be certain machine resources which you might not tack on a per unit basis also.
Example: If you are delivering 50 signs and you want to charge for the truck that is being used, you might not charge per sign that is being delivered, you might have a one time charge.
Again depends on the usage, use this flag to automatically multiply with the “Line Item Qty”
Margins - These are used if the material is not used from edge to edge. For example, a large format printer that has pinch rollers on the edge and the printer can only print between those rollers. You can add these margins to offset the area calculation.

Other Fields

Display on description - to display the machine charges on the PDF documents you send to your customers.
Std. operating procedure - use it to put in how to use the machine so that your employees know how to use this rate or how it should be used in an estimate.
Other details - use this to store any other info that you want to store about this machine rate.
Video URL - this can be used to attach an instructional or informative video link
Labor Rates
As of now the Labor Rate definitions are very similar to Machine Rates except these are to charge any labor charges. However as we embellish the Machine definitions and Labor definitions more, these two might have some unique differences; hence we have modeled them as separate charges as of now. Please refer to the Machine Rate documentation above to learn how to setup Labor Rates.
Pricing Attributes
In order to calculate the price using templates, the following inputs are needed, called, Pricing Attributes.
Pricing attributes are a set of attributes which will determine the price of the item. These pricing attributes are of two types,
1. Numeric
Numeric pricing types are attributes like, Width, Height, # of Sides etc.,
2. Boolean
Boolean pricing types are attributes like,
- Rush Charge - Should Rush fee be charged
- Install Charges - Should Install fee be charged
These 'Boolean' types of pricing attributes determine if a charge should be charged or not vs, 'Numeric' types are used to calculate some type of number (like area, perimeter etc.,).
You can add as many 'Numeric' types or ‘Boolean’ types of ‘Pricing Attributes’ to fit your needs. ShopVOX by default comes with a set of ‘Numeric’ and ‘Boolean’ ‘Pricing Attributes’ as listed below.
(Note this list might not be exactly the same as of today since these are added as needed by different industries).
Numeric Pricing Attributes examples

Boolean Pricing Attributes

Pricing Formulas
The other piece of these Pricing Templates is, Pricing Formulas. These are the formulas which determine how to charge X quantity of something, example, if you want to charge the Area of a material then the formula "Area" is used, which has the Pricing Attributes, Width & Height multiplied, Width*Height.
NOTE: As of now, you cannot add new pricing formulas nor edit existing pricing formulas provided.
The current available Pricing Formulas are as follows:


Pricing Templates
Pricing templates is where all the above five elements come together.
To reiterate those five components are:
- Materials
- Machine Rates
- Labor Rates
- Pricing Attributes
- Pricing Formulas
Think of “Pricing Template” as your Excel spreadsheet where you will put all these together and the formulas calculate depending upon the different inputs.
Key components of Pricing Template
On the Pricing Template page there are three main components:
- Attributes
- Required Pricing options
- Items to be charged
Attributes
Choose the input parameters which you want the User to input, which will in turn control what price to charge while creating a quote. For different types of Items you price, you will need different kinds of inputs.
Example: For a simple banner you might just ask Width and Height, however if you are pricing decals and you want to charge for “Contour Cutting” your input parameters will include a “Boolean” type of “Pricing Attribute” so the estimator can say “Yes/No” to contour cutting and if she selects “Yes” then the template can charge for this service depending upon how it is setup, which may be per cut or sqft or perimeter depending upon how you want to charge.
Required Material Options
These choices will be a drop down list to select from during the quoting process and only one of these options can be selected. You will add the different Material, Labor or Machine Types you want. The User who is estimating will choose from the options you provide for each option. You can also make these either mandatory or optional.
Click on the +Add Button as shown below:

and then you will get this popup window

Name - Give a descriptive name like "Choose a Substrate" or "Select an Apparel", depending upon what you want the type to be or what ever your naming convention will be.
Type - Any Material Type
Item Formula - Same as in the previous section.
Filter - Same as in the previous section
Fixed Qty - What is the minimum qty to choose
Multiplier - If you want to alter the default qty to be used per unit
Per Unit - Should it multiply with the line item Qty, so you dont need to do the math
Optional - Check this box to make this non-mandatory (Optional) while pricing in a quote
Items to be charged
These are the charges that will be added by default as per the formulas of these definitions (Materials/Labors/Machine charges) whenever this template is used. Here click on the

button to add as many default Materials/Labors/Machine charges you want to charge for whenever this template is used.
Once you have added all your choices, then click on the blue edit button on each of the rows that you just selected and you will see this form with four things. Here is what they mean and how to use it.

It is not necessary to add any more info if you want to use the default formulas that you have setup in the definition of the materials/machines/labors. However. if you want to alter the amount of Material/Labor/Machine charges just for this template; then you can alter it using these four elements.
Item Formula
Use this field to add any math to extend the default “Formula” that was setup for the material.
Let’s take an example, let’s say this is of the type “Material” that you have selected and the default formula is “Area” is how you have defined in the definition of the “Material”. However for this particular template you want to alter that depending upon the input attributes. Let’s say this material is “Vinyl” and you charge the end customer depending upon the area of the item you are pricing. If it is a one sided sign, then 1X the area is fine and that is the default amount of vinyl you will charge. However the number of sides for this sign = 2 then you want to charge 2X the area since you will be using as 2xArea of the item to make it and hence
… if the number of sides = 2 you want to multiply by 2.
Now how will you know there are 2 sides , that will be one of the “Attributes” that you will select as required input parameters, and say that attribute is called “Sides” and it is a numeric type then you will put that attribute name in this field.
Item Formula - Sides
So the result of the calculation of what amount to charge for this vinyl will be
“Sides” * Area = 'x' * Area based on how many “Sides” it is. This will be entered as a number by the end user while pricing it since that is one of the input parameters.
Just sit back and visualize it and you will see how this works and you will get it.

Filter
Filter is basically where you want to either charge or not charge this item depending upon the input and the parameter that will turn on/off this charge are generally the “Boolean” types of input parameters, example, “Contour Cut - Yes/No”, “Rounded Corners - Yes/No”, “Rush Fees - Yes/No” and so on. So if you want to turn on/off if an item you added here then put the input variable name in this “Filter” field.

Multiplier
Multiplier is nothing but an additional factor if you want to change the amount you charge for that given item.
Example: If you have vinyl and the coverage is generally only 60% you can put 0.6 here for this kind of template. So it is another way of changing the standard amount which is 1.0 to change for this template.
Another example is, if you always want to charge just for this Pricing template every time for 1 sqft /1sqm of the area 1.15X the area because it could be a very complicated process and generally there is wastage or so and you want to charge 15% extra. In such cases you will add 1.15 in this multiplier field.
Per Unit
“Per Unit” is should we multiply by the number of Line Item Qty? or not?
This information is also defaulted to what ever is in the Material/Machine/Labor definition, but there might be some case you want to change from the default. This will not for charge for all by changing this info in the Material/Labor/Machine definition but in the “Pricing Template”... so it only affects this particular template and none of the other templates. Again 90% of the time you might use the default but if you want to change that default then you can change it here.
If you don't do any changes by clicking the “Edit/pencil” button it will use all the default formulas and will charge it all the time when ever this template is used. However if you want to alter the formulas, to charge/not-charge and the multipliers go ahead and manipulate each of these fields in this section to fit the needs for this “Pricing Template”
Once you add all the above, save it and then see how it works in a quote.
